
Measuring the ANZACs Tutorial 4: Statement of Services
In our first three tutorials (One, Two, Three) we covered classification, and marking of Death Notifications and History Sheets. Today we turn the page (literally!) from the front of the History Sheet to its other side, the Statement of Services.
Before we dive into the details of the Statement of Services, lets recall our research goals. The research team are interested in how wartime service and experiences affects people’s health after the war. We know that other historians are interested in various ways in questions like “Who served in which battles, and with who, and what happened to them”. Knowing who was where when can tell us a lot about the connections between people in New Zealand society before, during and after the war; and it can tell us a lot about the military history of the New Zealand Expeditionary Force.
The Statement of Services helps us with these diverse research questions by summarizing the units in which men served, and for what periods of time. Operational histories of the units that have been published by the New Zealand Electronic Text Centre at Victoria University of Wellington will allow us to attach further detail about where men were serving on any given day of their service.
In short, the Statement of Services, like the front of the History Sheet is a very efficient way of summarizing the material in a man’s file. We can’t transcribe everything in a man’s file, so we are concentrating on material that will help you, and help researchers, zero in on the people they’re interested in for further exploration.
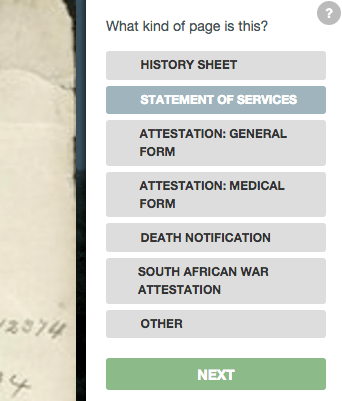
1. How do I recognize a Statement of Services?

Most of the time, it says so right at the top of the page, and you can jump over to the right hand of the page to classify this as a Statement of Services.
If the title is obscured you can recognize it from the data elements or columns that are listed
- Regiment or Corps
- Promotions, Reductions, Casualties
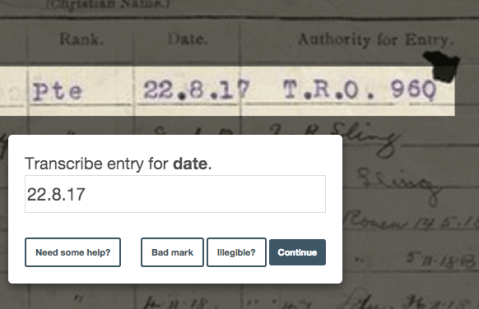
- Rank
- Unit
- Authority for Entry
2. Marking a Statement of Services
First mark the page as a Statement of Services, and then click NEXT.
Although we have multiple fields (columns) here, we ask you to mark whole rows. This means that when you (or someone else) transcribes the entries the material from each row is associated with each other. This is incredibly important in letting us create an accurate database of what happened to each person, with the correct dates for each change of status.
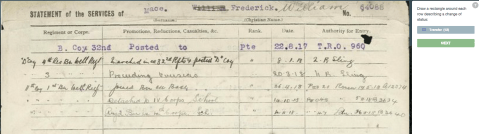
Click on “Transfer” and then mark a row. It will now look like this. 
Then mark another row.

and so on, until you have marked all the rows. 
Once you have marked all the rows you can click Next. Then we ask you to scroll down and mark the Particulars of Marriage if there is any information there. This will be really useful information for family historians.

As with the Transfers, you should draw across the whole row.

If there are any children, mark each child separately. 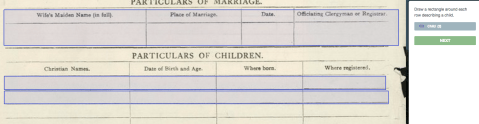
Finally, we ask you if anything is on the Conduct-Sheet section of the page. Our goal here is to index the men who had conduct incidents (really, misconduct) and re-sample those pages for transcription later in the project when we’ve transcribed everything we’re starting with. 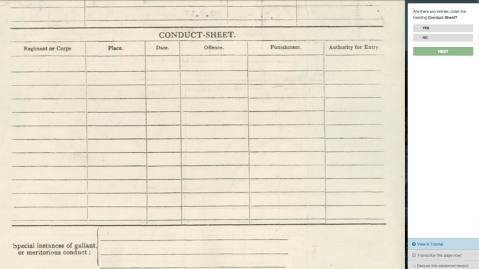
And that’s marking a Statement of Services. The key to doing it correctly is marking the whole row, and marking each row of information separately.
3. Transcribing the Statement of Services
Switch to the Transcribe mode, and you will see how your work interacts with the data. Remember, you marked each row, but now we’re dividing up the data into the fields you see there.
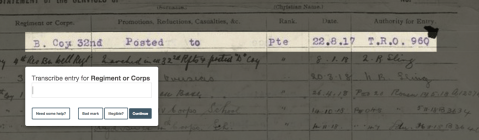
Type what you see in each box.
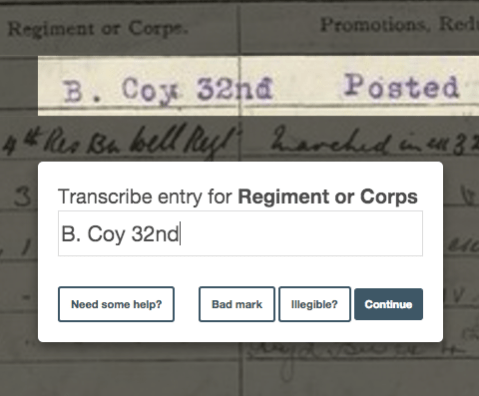
You can move the boxes around. With the dates it’s especially important that you type what you see, and being careful not to omit the punctuation between the day, month, and year.
Once every row is transcribed and in our database, we can calculate how long a man was in each “status” by sorting the transfers by date, and calculating the difference between each sequence of events.
You are welcome to transcribe the original entry instead of the “ditto” marks. But if we have all the events in place we can actually work out what the ditto marks are by looking “up” the electronic version of the data to see what the ditto mark is referring to.
Now we’ve completed looking at the documents describing what happened to men during the war, our next tutorials will look at the attestations which have different information and different challenges.
Evan Roberts

Trackbacks / Pingbacks